I kept thinking, it's only been 2 weeks since my last update, or was it 3? I had stuff to report, but no verve to write about it.
I had a few minutes this morning and am excited about today's plans, so I thought I'd pop in and give a preview. When I saw the date of the last post, I was shocked! I cannot believe time goes so quickly.
So, yesterday, we had visitors! Corinne and Bill, my friend April's sister and brother in law (who live about 30 minutes away--April lives in NJ) stopped in to visit and see our cabinets. I know, I'm not allowed to show them here yet, but Corinne had contacted me to ask about whether we were pleased with our purchase since they're considering using the same company for their cabinets during their kitchen remodel. And being one of my 5 or so loyal readers (you know who you are!) I of course said, yes, we'd love to show them off!
We are really happy with them, though when we were designing and ordering them, and when it was time to hit that "purchase" button it was a little bit nerve wracking, having never seen them in person! We were happy Corinne and Bill wanted to come up and check them out before they ordered theirs. They liked them! They brought us a pie! (what nice guests--and it's delicious!). We had a nice time swapping stories.
Then, M and I started something big. One of the things I've been dying to get started (and finished) Really big. We only had about 2 hours to work on it, and will head back out to DG shortly to pick up where we left off, but can you say WOOD FLOORING!?! We have about 20 or so pieces down, and it's so pretty. I can't wait to get back to work on it. Oh, gee, maybe I should turn the computer off and enjoy a lovely Sunday working on my new floors!
More soon, with photos!
Sunday, October 14, 2012

Tuesday, September 18, 2012
My summer garden
This is the third summer (wow!) that I've had a garden at DG. It's a great spot as it's super sunny and there's plenty of room. You might remember that we (and by we, I mean M) did a lot of new irrigation this spring, for both the orchard and dahlia garden (both new this year) as well as to the garden (improvements over last year).
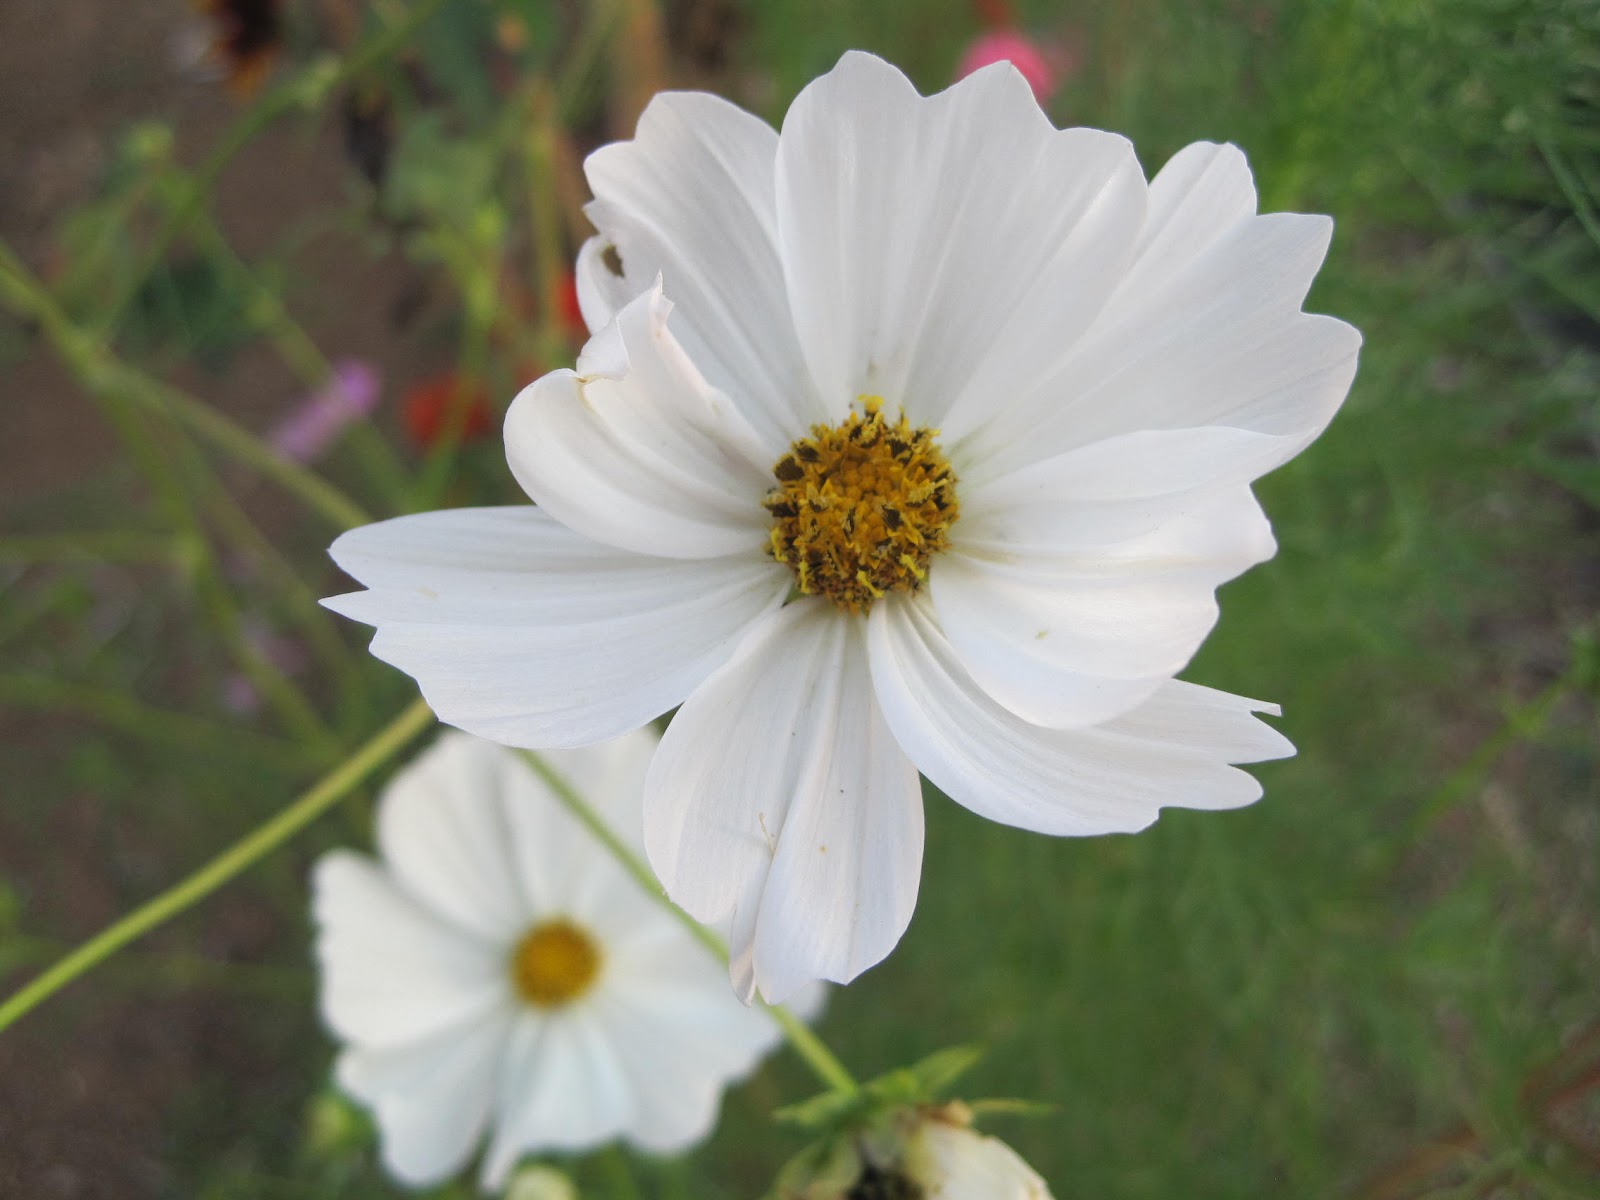
I've always planted a few flowers in the vegetable garden proper, and this summer I expanded what I'd done in the past. I started with a couple nursery sunflowers, then one 6-pack of Zinnias, and then a lot of volunteer Cosmos came up.
It was looking great.


I kind of fell a little bit in love with the sunflowers, so I bought a couple packets of seeds and planted them in July. Felt kinda late, but it was a cheap risk. And here's what I got--though none of them are as tall or girthy-stemmed as the transplants from the nursery, they are so darn cheery. They make me happy.


At least these flowers have been a success. The vegetable portion of the garden has been a mixed bag. The cherry tomatoes (1 yellow, 1 red, 1 orange) are doing reliably well (all except for one). The regular sized tomatoes are unhealthy and not bearing very well. The peppers (jalapenos and serranos) are bearing well, but they're so tiny that a couple of the "bushes" have only 2 peppers each (the whole plants are only about 8 inches tall). The squash is the only thing that's going gangbusters--and there only one of the two. The yellow straightneck has not bourne a single pick-worthy specimen. The other one, some kind of light green-skinned slightly rounded end zucchini-like fellow is trying to singlehandedly feed the world.
We think that our amendments in the raised beds cause too much of the water to filter through too quickly. The irrigation system is working well, but to combat our super-clay-ey soil, we added lots of amendments, and apparently not enough native soil. Poor little plants are doing their best, but in some cases, they've just struggled for months.
Next year will be different on several fronts: it should be much easier to tend since we'll be living there and it won't be a drive out there after work to harvest, weed, etc; we plan to re-design the layout of the garden and will either remove the raised beds, or re-dig them. One thing that won't change is to have abundant flowers in the veggie garden. It's such a happy place to be!
I've always planted a few flowers in the vegetable garden proper, and this summer I expanded what I'd done in the past. I started with a couple nursery sunflowers, then one 6-pack of Zinnias, and then a lot of volunteer Cosmos came up.
 |
| 1 of 2 Sunflowers from the nursery. Each plant had dozens |
It was looking great.
 |
| Zinnias: so much bang for my measly 6-pack buck! |

 | |
| Volunteer Cosmos--love them |
I kind of fell a little bit in love with the sunflowers, so I bought a couple packets of seeds and planted them in July. Felt kinda late, but it was a cheap risk. And here's what I got--though none of them are as tall or girthy-stemmed as the transplants from the nursery, they are so darn cheery. They make me happy.


At least these flowers have been a success. The vegetable portion of the garden has been a mixed bag. The cherry tomatoes (1 yellow, 1 red, 1 orange) are doing reliably well (all except for one). The regular sized tomatoes are unhealthy and not bearing very well. The peppers (jalapenos and serranos) are bearing well, but they're so tiny that a couple of the "bushes" have only 2 peppers each (the whole plants are only about 8 inches tall). The squash is the only thing that's going gangbusters--and there only one of the two. The yellow straightneck has not bourne a single pick-worthy specimen. The other one, some kind of light green-skinned slightly rounded end zucchini-like fellow is trying to singlehandedly feed the world.
We think that our amendments in the raised beds cause too much of the water to filter through too quickly. The irrigation system is working well, but to combat our super-clay-ey soil, we added lots of amendments, and apparently not enough native soil. Poor little plants are doing their best, but in some cases, they've just struggled for months.
Next year will be different on several fronts: it should be much easier to tend since we'll be living there and it won't be a drive out there after work to harvest, weed, etc; we plan to re-design the layout of the garden and will either remove the raised beds, or re-dig them. One thing that won't change is to have abundant flowers in the veggie garden. It's such a happy place to be!
 |
| The garden, looking west, at sunset |
Friday, September 14, 2012
Behind the scenes (or why I'm gonna get in trouble for this)
A professional photographer, I am not. Heck, I'm not even a good photographer. But my little Cannon PowerShot, purchased on my trip from NJ to Cali 4+ years ago (when I started this blog!) is a good chronicler of progress at DG.
Mostly, I try to take photos that show the before, after, and sometimes in between. I hope I'm mostly successful in getting the point or the image across. I do try to frame them so that the focus is on what I'm trying to show, and not the spilling open took chest just to the left of the photo. If only to give the illusion that all is tidy. Well, not so much.
Three nights ago I was at DG after work, and while M was mocking up a dresser-as-vanity for me, I wandered around the house snapping photos. I want to remember what this construction phase was like.
So for something different, I thought I'd show you today what I normally try NOT to include in the photos. I may get in trouble for this. But it'll be a nice reminder of the semi-chaos once everything is buttoned up and we've moved in.
So there you have it. We have lots of projects started, and few completely finished. And while this used to drive me crazy, I now realize that this is the way M works best. Many times she gets started, then gets stuck, moves on to something else, and then realizes a perfect solution to the original issue. Her mind is amazing. I also now know that it all gets finished sooner or later.
I'll leave you with a preview of my weekend project: Laundry room floors! Can you guess what we're doing?
.JPG)
Happy Weekend!
Mostly, I try to take photos that show the before, after, and sometimes in between. I hope I'm mostly successful in getting the point or the image across. I do try to frame them so that the focus is on what I'm trying to show, and not the spilling open took chest just to the left of the photo. If only to give the illusion that all is tidy. Well, not so much.
Three nights ago I was at DG after work, and while M was mocking up a dresser-as-vanity for me, I wandered around the house snapping photos. I want to remember what this construction phase was like.
So for something different, I thought I'd show you today what I normally try NOT to include in the photos. I may get in trouble for this. But it'll be a nice reminder of the semi-chaos once everything is buttoned up and we've moved in.
 |
| Master bedroom with tile staged for bathroom |
 |
| Guest bedroom window seat in progress |
 |
| Upstairs loft with Chair, Ladder and Chopsaw |
 |
| More master bathroom tile staging in master bedroom |
 |
| Window, door and baseboard trim awaiting installation |
 |
| Willie in the sawdust. Really, that's the best place to rest? |
 |
| Looking out the garage door toward the front porch. ACK! |
 |
| Partial view of accumulation on garage side of house |
 | ||
| Garage workshop |
So there you have it. We have lots of projects started, and few completely finished. And while this used to drive me crazy, I now realize that this is the way M works best. Many times she gets started, then gets stuck, moves on to something else, and then realizes a perfect solution to the original issue. Her mind is amazing. I also now know that it all gets finished sooner or later.
I'll leave you with a preview of my weekend project: Laundry room floors! Can you guess what we're doing?
.JPG)
Happy Weekend!
Wednesday, September 12, 2012
Half day adventure
On Tuesday evening, M and I were at DG looking at the vanities we bought during the summer. I've alluded to them before, and I know I haven't shown them yet. Soon . . .
So we were looking at several different options for modifications (making them high enough) and suddenly, I realized that if we'd bought a 3rd "dresser" (we're not sure exactly what they originally were) M could cut it apart and more easily modify the two that need the extra height.
So, we called the guy at the Antique Centre in Berkeley (his hours are sporadic) and confirmed that he would be there this afternoon, and I took a last minute half day off and we flew down to Berkeley (not literally, it's a 2 hour drive, but we were there before 3!). We got the third dresser (kind of sad to separate them--he originally had 6), plus a mate to some plates I bought there last time and some matching saucers.
We stopped in at Urban Ore, a (mostly) overpriced salvage shop in Berkeley, visited another lighting store, had a quick dinner at Picante in North Berkeley, and made it home just about 9pm. It was a fun afternoon adventure!
I'll write more about the dresser/vanities soon, but each one was $50, and that third one will save M quite a bit of time, which is key. Thanksgiving* is only 10 weeks away, afterall, so time is of the essence!
*M promised me we would be in by Thanksgiving 2012. I am a bit dubious, but still hoping for the best.
So we were looking at several different options for modifications (making them high enough) and suddenly, I realized that if we'd bought a 3rd "dresser" (we're not sure exactly what they originally were) M could cut it apart and more easily modify the two that need the extra height.
So, we called the guy at the Antique Centre in Berkeley (his hours are sporadic) and confirmed that he would be there this afternoon, and I took a last minute half day off and we flew down to Berkeley (not literally, it's a 2 hour drive, but we were there before 3!). We got the third dresser (kind of sad to separate them--he originally had 6), plus a mate to some plates I bought there last time and some matching saucers.
We stopped in at Urban Ore, a (mostly) overpriced salvage shop in Berkeley, visited another lighting store, had a quick dinner at Picante in North Berkeley, and made it home just about 9pm. It was a fun afternoon adventure!
I'll write more about the dresser/vanities soon, but each one was $50, and that third one will save M quite a bit of time, which is key. Thanksgiving* is only 10 weeks away, afterall, so time is of the essence!
*M promised me we would be in by Thanksgiving 2012. I am a bit dubious, but still hoping for the best.
Wednesday, September 5, 2012
My two new favorite things
So, work continues, but nothing too major to report on. Kitchen cabinet tweaks are ongoing (and though I've had requests for photos, M says NO! Not until they're finished! I'm dying to show them, though), electrical, and trim also continues. Since I have no exciting photos (though soon I need to share the story of the bathroom vanities) that are of the moment, I thought I'd share two of my favorite new things.
It's the left side of the pantry under the stairs. It's small, but should be pretty functional. It'll all get painted white once complete. Here's the right side view: aren't those insets neat-o?
The pantry is right off the dining nook and kitchen, and in the hallway that adjoins the mudroom and laundry room. We're still trying to figure out how to put some kind of door or closure on it, since there's another door (to close off the mud room/laundry room area from the main room) and a door to the pantry would kind of get in the way to the other door. We shall see.
Here's my other favorite thing. The mondo HVAC unit (guess I'll have to show you all a photo of that, too!) has ginormous ductwork that goes through the loft area (behind the wall), through the guest room out in the open, and then through the ceiling to the ground floor. It was pretty unsightly, but look what M built!
It's the base of a window seat that will likely also have built in book cases on each side. Here are two pics that give better perspective:
It's great to get all this little stuff checked off--this is all the stuff that I fear will delay us in the end. But every day, something new is resolved/built/finished/started, etc. Last night, M spent most of the night sketching and designing the kitchen island. It's challenging to work within our increasingly low budget to get everything we want. M is amazing at modifying things to make them just right. You'll see what I mean when I show you the before and after of the master bath vanities. The before will be soon. You may have to wait for the after, since the vanities are still in the "before" state!
 | |
| What is it? |
It's the left side of the pantry under the stairs. It's small, but should be pretty functional. It'll all get painted white once complete. Here's the right side view: aren't those insets neat-o?
 |
| Right inside of pantry. Insets will get shelves. |
The pantry is right off the dining nook and kitchen, and in the hallway that adjoins the mudroom and laundry room. We're still trying to figure out how to put some kind of door or closure on it, since there's another door (to close off the mud room/laundry room area from the main room) and a door to the pantry would kind of get in the way to the other door. We shall see.
Here's my other favorite thing. The mondo HVAC unit (guess I'll have to show you all a photo of that, too!) has ginormous ductwork that goes through the loft area (behind the wall), through the guest room out in the open, and then through the ceiling to the ground floor. It was pretty unsightly, but look what M built!
 |
| Close up of the unsightliness |
It's the base of a window seat that will likely also have built in book cases on each side. Here are two pics that give better perspective:
 |
| Guest room window seat base, view out the back of the house |
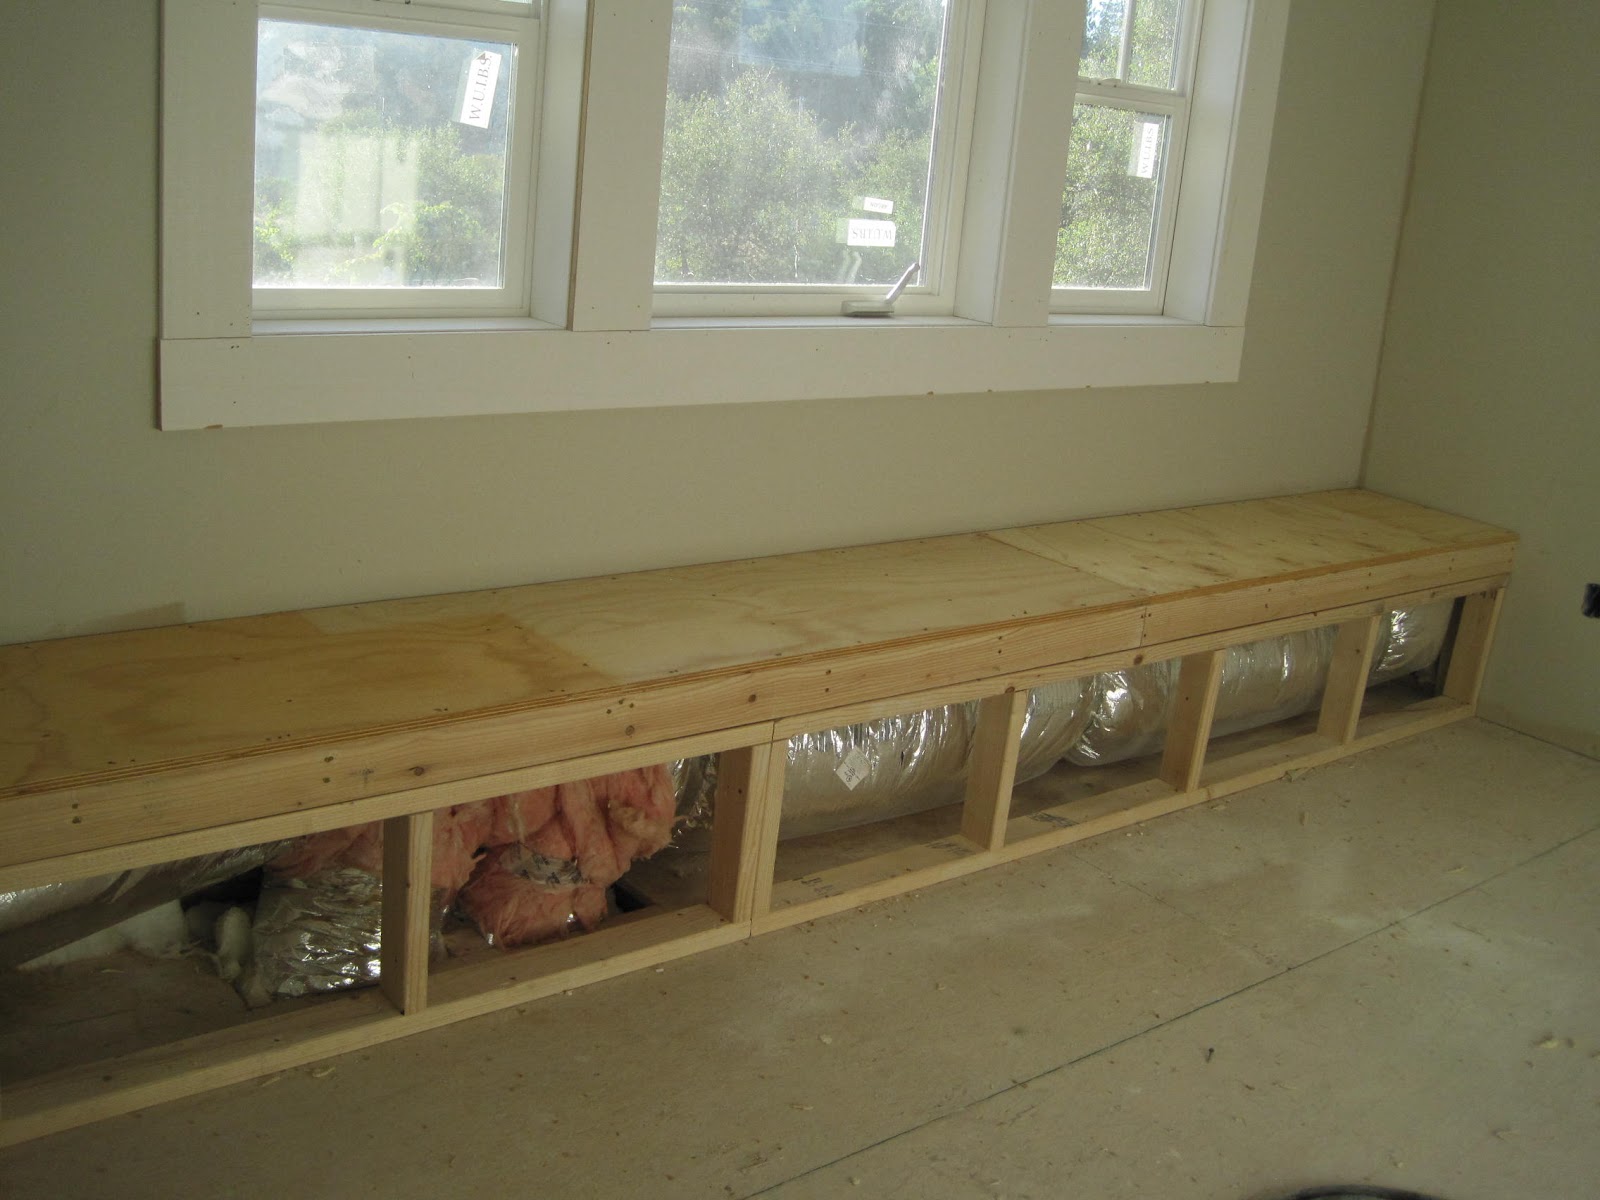 | ||
| Same seat, different perspective |
It's great to get all this little stuff checked off--this is all the stuff that I fear will delay us in the end. But every day, something new is resolved/built/finished/started, etc. Last night, M spent most of the night sketching and designing the kitchen island. It's challenging to work within our increasingly low budget to get everything we want. M is amazing at modifying things to make them just right. You'll see what I mean when I show you the before and after of the master bath vanities. The before will be soon. You may have to wait for the after, since the vanities are still in the "before" state!
Tuesday, September 4, 2012
Too hot for heated floors
It's hot again, though with the shorter days, the nights have been lovely and cool. It's like a nicer way to have heat.
And speaking of heat, the wire for the heated master bath floor was installed about a week ago. M's mom came over as "helper" for the day (she loves to get home construction assignments, and has been a huge help) and after some discussion about how to lay the wire so as to use it all, not lay it in areas where it's unnecessary (like under the vanity cabinets), and how not to run out, they gave it a go. Apparently, you're not supposed to cut this stuff.
And speaking of heat, the wire for the heated master bath floor was installed about a week ago. M's mom came over as "helper" for the day (she loves to get home construction assignments, and has been a huge help) and after some discussion about how to lay the wire so as to use it all, not lay it in areas where it's unnecessary (like under the vanity cabinets), and how not to run out, they gave it a go. Apparently, you're not supposed to cut this stuff.
 |
| Laying the wire in front of the entrance and shower |
 |
| M's Mom insisted the photo show her spool placement |
Note the paint that's not finished in the photo above (final color is pale blue. Taupe was primer). See previous post.
 |
| oooh. You can see the pretty door and window trim |
M is so good at this stuff--the layout was perfect: it covered all, didn't need to be cut, and was a job well done. Obviously, she has good knees! And what a great helper!
Now on those cold winter mornings, our toes will be toasty under the tile!
Tuesday, August 28, 2012
Why I'm not allowed to do edging
We've been getting our paint on at DG. Well, I have. It's one of the few things I can do without a lot of help, direction, supervision, etc. What can I say: I'm just not experienced at house construction.
We forced ourselves to choose some of our colors quite a while ago, so that we could paint around the windows and doors so the trim wouldn't have to be masked off when we painted. Great idea. And then as I had time to work, and no other skills, I started to try and finish rooms so we could button things up one by one. Except for the ceiling edge, where the colors need to be cut in.
Which is why when you walk around the house, it looks like the photo above. I kept thinking that I ought to be able to master this skill, and so working in the guest bath, (in green no less!) with a low, attic-y ceiling (i.e. within reach) I thought I'd be able to give it a try and succeed! I would learn to cut in and our house would stop looking like I was leaving all the hard work for M.
Well, it didn't go so well. I should mention I had an old brush, and thick paint, but still. I was defeated. But then M came home with my new best friend:
My new, shortie, rubber handled best brush ever. He made it possible (though I'm still not good) to do a, well, adequate job. In the hallway where no one will ever look (and where I could easily see what I was doing on a short step ladder). Then I got cocky. I decided to try an area right between the kitchen and diningroom, where the ceiling is higher, and still only on my stepladder.
Does this look good to you? No. And of course our neighbor Dan (what are the chances that two of our neighbors are painters?) came over yesterday and walked around and inspected. M told him that cutting in made me cry. Not exactly, but she managed to get him to agree to a day of finish painting for us (all of it!) in trade for a day when she'll help him with some tractor work. A win win!
And so, I may always be a fan of blue tape. From a distance, I got a decent effect (with a half roll of tape or so) in the bathroom.
Not bad from a distance, right? (note the color looks a little different in the photo than in person) Maybe Dan will enjoy cutting in around the ceiling over the tub. I couldn't reach there.
BTW, here's the master bedroom color--a deeper version of the Guest bedroom and the downstairs. It's really rich and in person it changes as the light changes throughout the day.
I still love my little brush and suspect I'll have more opportunities to get to know his style. But for now, I'm more than happy to let Dan take over for me!
P.S. Happy 100th post everyone. I started this blog 3-1/2 years ago when I was getting ready to move from New Jersey, and I wanted to chronicle the trip across country. It turned into our home construction blog a couple years ago, and though I know my fan base is tiny (what are there, 3 or 4 of you now?) it really is a good way for me to track our accomplishments and document the process. Thanks for reading and once in a while asking for more AuntieK. Warms my heart!
We forced ourselves to choose some of our colors quite a while ago, so that we could paint around the windows and doors so the trim wouldn't have to be masked off when we painted. Great idea. And then as I had time to work, and no other skills, I started to try and finish rooms so we could button things up one by one. Except for the ceiling edge, where the colors need to be cut in.
 | |||
| Living room color. |
Which is why when you walk around the house, it looks like the photo above. I kept thinking that I ought to be able to master this skill, and so working in the guest bath, (in green no less!) with a low, attic-y ceiling (i.e. within reach) I thought I'd be able to give it a try and succeed! I would learn to cut in and our house would stop looking like I was leaving all the hard work for M.
Well, it didn't go so well. I should mention I had an old brush, and thick paint, but still. I was defeated. But then M came home with my new best friend:
 |
| Isn't he cute? |
My new, shortie, rubber handled best brush ever. He made it possible (though I'm still not good) to do a, well, adequate job. In the hallway where no one will ever look (and where I could easily see what I was doing on a short step ladder). Then I got cocky. I decided to try an area right between the kitchen and diningroom, where the ceiling is higher, and still only on my stepladder.
 |
| Poor quality photo, but it drives home the point, eh? |
Does this look good to you? No. And of course our neighbor Dan (what are the chances that two of our neighbors are painters?) came over yesterday and walked around and inspected. M told him that cutting in made me cry. Not exactly, but she managed to get him to agree to a day of finish painting for us (all of it!) in trade for a day when she'll help him with some tractor work. A win win!
And so, I may always be a fan of blue tape. From a distance, I got a decent effect (with a half roll of tape or so) in the bathroom.
 |
| Guest Bath paint (still incomplete above the tub) |
Not bad from a distance, right? (note the color looks a little different in the photo than in person) Maybe Dan will enjoy cutting in around the ceiling over the tub. I couldn't reach there.
BTW, here's the master bedroom color--a deeper version of the Guest bedroom and the downstairs. It's really rich and in person it changes as the light changes throughout the day.
 |
| Master bedroom color. Looking out window at front of house. |
I still love my little brush and suspect I'll have more opportunities to get to know his style. But for now, I'm more than happy to let Dan take over for me!
P.S. Happy 100th post everyone. I started this blog 3-1/2 years ago when I was getting ready to move from New Jersey, and I wanted to chronicle the trip across country. It turned into our home construction blog a couple years ago, and though I know my fan base is tiny (what are there, 3 or 4 of you now?) it really is a good way for me to track our accomplishments and document the process. Thanks for reading and once in a while asking for more AuntieK. Warms my heart!
Subscribe to:
Posts (Atom)